 The shocking start of 2020 revealed what was obviously a long time ago. Your business is almost worthless if it is not properly presented on the web. E-shops, configurators & calculators are powerful tools for internet sales. But there is a 'small' problem with the garage door sales. In most cases, the opening must be measured.
Nowadays the time is precious as never before. A lot of garage doors' dealers are selling garage doors even without measuring. That means the only thing - the end-user is responsible for exact figures when placing an order.
A personnel problem exists as well. It takes time to
train a rookie and make him remember all the technical nuances of the garage door
business. Without having enough practice, the possibility of making a mistake
is quite high. The mixture of door types, gears, designs allows to pick up the
right door for each customer, but also require a good technical background.
A professionally made site survey helps to make the right choice and minimize error chance in the whole ordering chain from
surveyor-sales manager-office assistant-manufacturer-installer.
In this post, I’ll try to describe the main garage door measuring tips with specific details for each of 3 main garage door types: sectional, side hinged and sliding and two installation positions: ‘behind reveal’ and ‘in-between’ the opening.
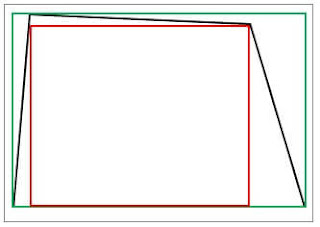
For e.g., in Picture 1 you can see irregular quadrilateral shape opening, shown in black lines. The red line shows ‘in-between’ and the green one – ‘behind reveal’ installation positions.
 |
| Picture 1 |
On the other hand, to get the desired house design weird garage door opening shape can be made by purpose. The same is with arched openings as well.
But the main point is to show how different garage door sizes can be depending on how the opening was measured. Please measure in several places and write down all readings accurately on the paper.
Sectional garage doors can be fitted behind reveal and
in-between the opening. Side-hinged doors usually are fitted in between but in special
cases behind reveal or on the front wall. Sectional side-sliding doors are installed
behind reveal only.
Basic observations
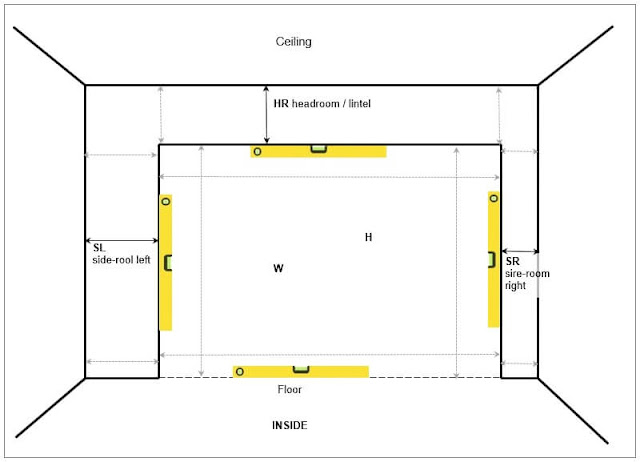
There are 6 basic measures and observations to be done during the site survey. (Picture 2 view from the inside of garage):
 |
| Picture 2 |
W – width of the opening,
H – the height of the opening,
OH – the height of the headroom, usually it is the height
of lintel,
SL, SR – free space on left & right side-rooms,
D – free space on the ceiling.
In unusual or complicated cases take pictures. It will be easier
later to find out the technical solution. Every problem can be sorted out with the help of an expert.
These basic measures are important for all garage door
types.
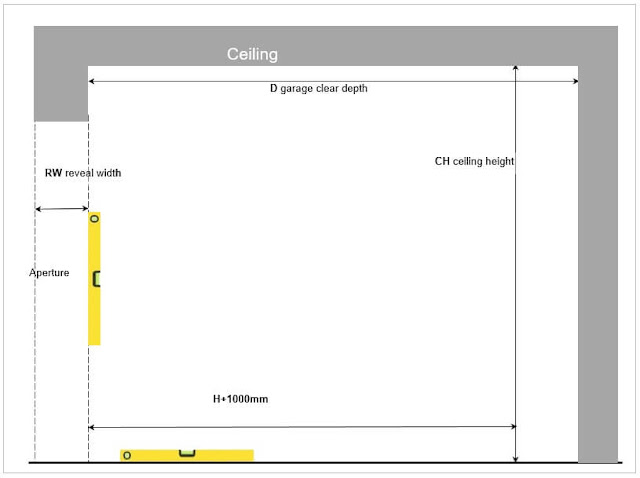
Picture 3 show more measurings to be done. Very often ignorance of garage door depth or downwards sloping ceiling lead to expensive mistakes.
 |
| Picture 3 |
Headroom & side-rooms
Very important for doors installed behind reveal. First, headroom & side-rooms must be on one plane. Take a picture and measure if part of the surface is jutted out or recessed. Usually, it can be sorted out with timber or plaster.
 |
| Picture 4 |
For sectional doors are critical at least 150 mm of lintel and 100 mm of side-room. For side-sliding garage doors – 120 mm of lintel and whole side-room on the door opening direction side. Check exact technical data for each door type or consult the manufacturer.
Headroom and side-rooms are the favourited places to mount pipes, cables, gas meters or other obstacles. Please measure size up to the obstacle. In Picture 4 you can see some examples of what kind of obstacles can occur.
 |
| Picture 5 |
Ceiling & Garage Depth
Both sectional and sliding doors require specific
installation depth. It can vary depending on headroom for sectional and
side-room for sliding garage doors. In any case, the garage door depth D must
be measured.
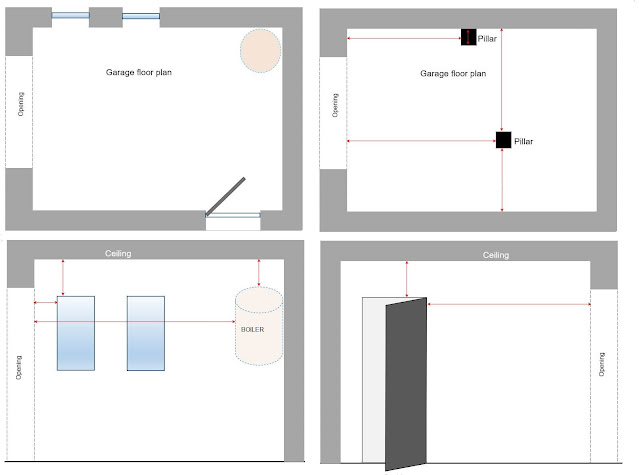
Secondary lintel, ventilation or sewage pipes, pillars, shelves or boilers could cause problems as well. It could also happen that the garage has an irregular shape - acute or obtuse corners, non-quadrilateral, etc. Document all facts on-site – make drawings with measures, take pictures.
In Picture 6 you can see a few complicated cases that can affect garage door model selection and installation. So please measure everything - it won't be too much, but for a door expert will be easier to find the best solution.
 |
| Picture 6 |
Windows & Doors on Side Walls
If so, make drawings with measures, mark opening directions, take pictures. The customer won’t be happy if after garage door installation the side door will be blocked, or windows shaded. Having the information, you’ll be able to explain to the customer what is necessary to rearrange or what inconveniences could arise. Customer, knowing all circumstances in advance and accepting, will not be able to complain after installation.
Pitched roof
What if there is a pitched roof with a ceiling sloping up? It is actual only
for sectional door because it can be manufactured with a ‘pitched roof’ track system which follows the ceiling's slope. Pitched-roof tracks are excellent space savers so it is worth to measure a pitch angle.
How to measure the pitch angle is shown in Picture 7.
 |
| Picture 7 |
H2=H1-H+OH
α=arctg(H2/L)
Use the scientific calculator or Excel formula: =DEGREES(ATAN(H2/L))
L- can be any distance that is convenient to use for ceiling height measurement.
Please observe garage space where guiding rails or tracks will be installed and the door will be moving during the operation. Check for pillars, support constructions, non-straight walls, non-rectangular shape, racks, shelves, etc.
Corners
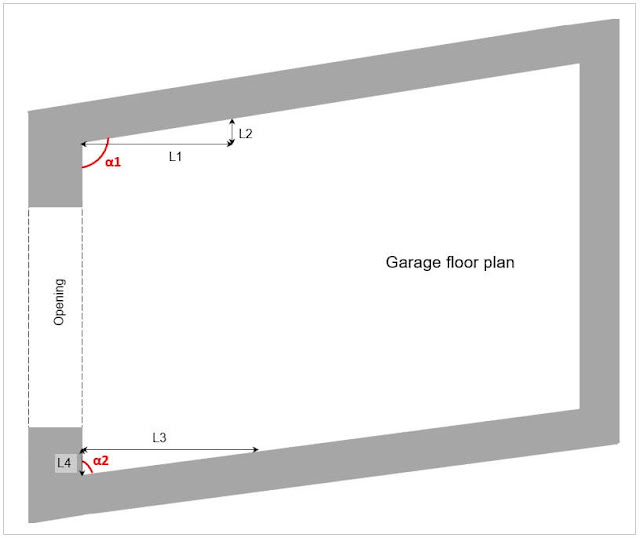
Please check the corners alongside the opening. Right angle corners usually come as standard, but in some cases, you can find acute or obtuse corners. If you are so 'lucky', Picture 8 is for you.
For sectional garage doors, it is important to avoid horizontal track intersection with the sidewall. Sliding doors as standard are made with the right-angle corner but can be made with acute or obtuse corners as well. You have to measure the angle to specify in the order.
 |
| Picture 8 |
The calculations are similar to pitched roof angle.
To calculate the angle use your scientific calculator or Excel formula or simply search the web for ‘trigonometry calculator online’ to find out the angle.
α1=90°+arctg(L2/L1)
Reveal width
An important measurement for doors installed in between the opening. Especially for sectional garage doors installed flush with the front wall. Wide reveals can cause additional problems for doors with electric openers and for some track systems. Knowing the reveal width, you can choose the best combination of lintel height, track type and door opener.
Floor & Driveway Level
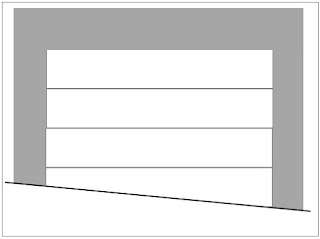
Check if the floor is level. Very often case on the side
sloping driveways.
Very light slope acceptable for hinged doors if the
garage is not used for cars. Up to 5 mm difference between corners can be
compensated with packers during installation. But keep in mind – the frame must
be made according to the shortest measure to fit into the opening.
 |
| Picture 9 |
Critical specification for sliding doors. The floor must be level in all directions. Al least on the door travelling path. If not, some cutting or cementing job must be done to get the floor level.
 |
| Picture 10 |
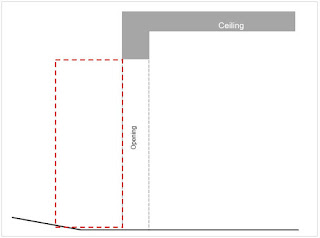
For side hinged garage doors you should check the driveway slope in front of the garage door. Please pay attention if the slope looks like in the picture. Door leafs can obstruct the driveway and won't fully open. The solution could be a raised threshold or bi-folding leafs.
Please visit our 'Partnership' page to download 'Site survey form'
Comments
Post a Comment